How to install SAP GUI on Windows
Here are the steps to install SAP GUI on Windows:
1. Download SAP GUI: Visit the SAP website and download the SAP GUI installation file for Windows. Download here.
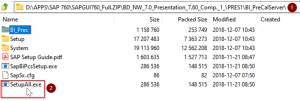
2. Launch the installation file: Double-click the downloaded installation file to start the installation process.
3. Select installation type: Choose whether you want to install SAP GUI for a single user or for all users on the computer.
4. Accept license agreement: Read and accept the SAP license agreement.
5. Select installation directory: Choose the directory where you want to install SAP GUI.
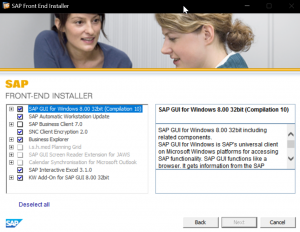
6. Select components to install: Choose the components of SAP GUI that you want to install, such as the SAP Logon Pad or SAP Business Explorer.
7. Configure SAP Logon Pad: If you are installing the SAP Logon Pad, you will need to configure the settings for connecting to SAP systems.
8. Complete the installation: Once you have selected all the components to install, click the “Install” button to begin the installation process.
9. Launch SAP GUI: Once the installation is complete, launch SAP GUI by clicking on the SAP Logon Pad or the SAP GUI shortcut on your desktop.
Log in to SAP system: Enter the connection details for your SAP system, including the system ID, application server, client number, user ID, and password.
Once you have logged in to SAP, you can begin using the SAP GUI interface to access the various SAP applications and features.
